2024 DIY Headshot Trends
As we step into 2024, the approach to DIY headshots is embracing more authenticity and naturalness. Here are some key trends to consider for updating your headshot techniques:
- Embrace Color and Natural Settings: The trend is shifting from dramatic monochrome to more natural and colorful presentations. Use warm lighting and choose bright but neutral backgrounds to create an inviting and authentic atmosphere.
- Casual and Relaxed Styling: Gone are the days of overly stiff corporate headshots. Now, the focus is on casual dressing, relaxed poses, and subtle smiles. Aim for headshots that convey approachability and authenticity.
- Authenticity Over Perfection: People are seeking realness in images. It's okay to show some minor imperfections or asymmetry. Genuine expressions are more valued than overly posed or perfect shots.
- Storytelling Through Environment: Use your environment to add context to your headshot. Whether it’s an office setting, outdoors, or a personal space that reflects your profession or personality, let your surroundings tell a story.
- Consistency for Team Cohesion: If taking headshots for a team, strive for a unified look through coordinated outfits and poses. This doesn’t mean identical, but aligned in style and tone to reinforce team unity.
- Reflecting Cultural and Personal Identity: Particularly for startups and creative businesses, there's a trend towards more artistic, less traditional headshots. Allow your personality and company culture to shine through in your choice of setting, attire, and pose.
Remember, while it's great to be aware of trends, the most important aspect is to capture a headshot that genuinely represents you or your brand. Authenticity and personalization remain key, transcending temporary fads.
7 Steps to Capture Your Own Headshot
Taking a professional headshot with an iPhone is a simple process, and with a few tips, you can get a professional-looking photo. Here are some steps you can follow:
- Find a well-lit area: Lighting is essential when it comes to taking a headshot. You want to find an area with plenty of natural light, but avoid direct sunlight, as it can create harsh shadows. A well-lit indoor space with a large window or open door can also work. For optimal headshots, lighting plays a crucial role. Consider using a soft, diffused light source to eliminate harsh shadows. If indoors, position near a window with natural light but avoid direct sunlight. Experiment with angles to find the most flattering light. For consistency and professionalism, consider investing in a ring light or softbox."
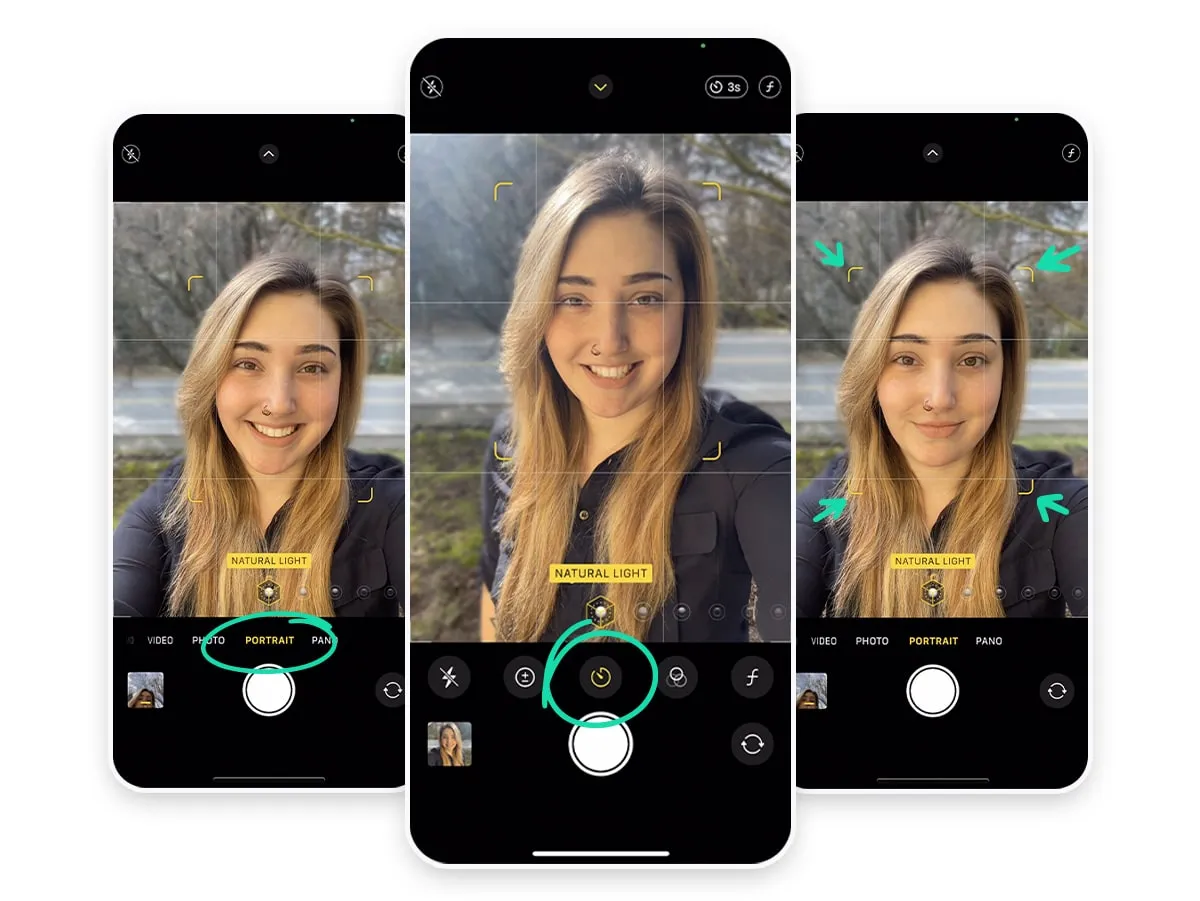
- Use portrait mode: The iPhone has a built-in portrait mode that can help create a shallow depth of field effect, blurring the background and bringing the subject into focus. This will help make your headshot stand out. The background can significantly impact the professional appeal of your headshot. Opt for a simple, uncluttered background that doesn't distract from the subject. Neutral colors like light grey, beige, or off-white work best. Ensure the background is well-lit and complements your attire and skin tone.
- Positioning: Make sure you’re facing the light source and positioned in a way that you feel comfortable. You should be looking directly at the camera with your shoulders relaxed. Your pose and expression can convey professionalism and confidence. Keep your posture straight yet relaxed. Practice natural smiles in the mirror to find your best angle. Slightly tilt your head to create a more dynamic and engaging photo. Remember, a genuine smile can make a significant difference.
- Focus on your face: Tap your face on the iPhone screen to ensure that the focus is on the you, and not the background.
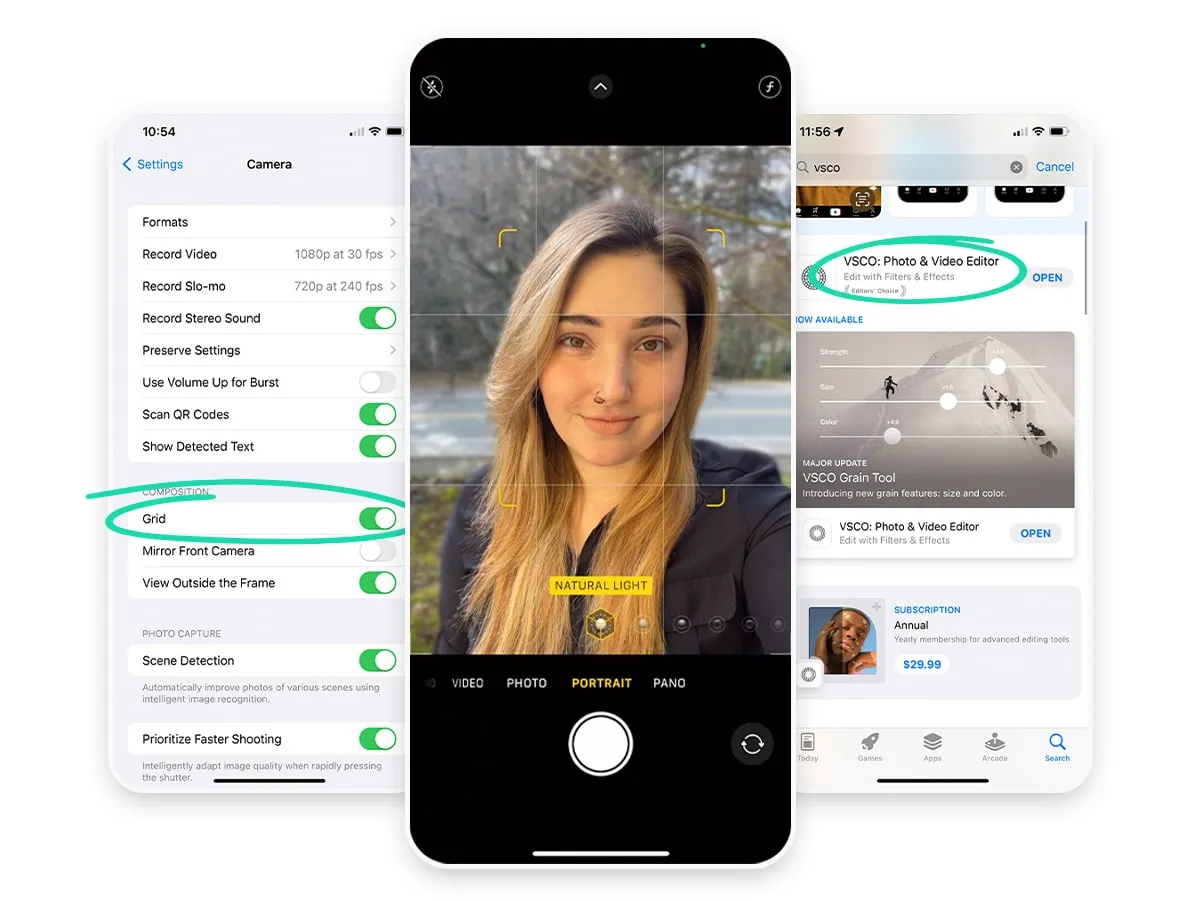
- Use the gridlines: Turn on the gridlines in the camera settings, and use the rule of thirds to position your face in the top or bottom third of the photo. This will create a more visually pleasing image.
- Take multiple shots: Take several shots to ensure that you capture the perfect shot. You can also experiment with different angles, lighting, and poses to find the best look.
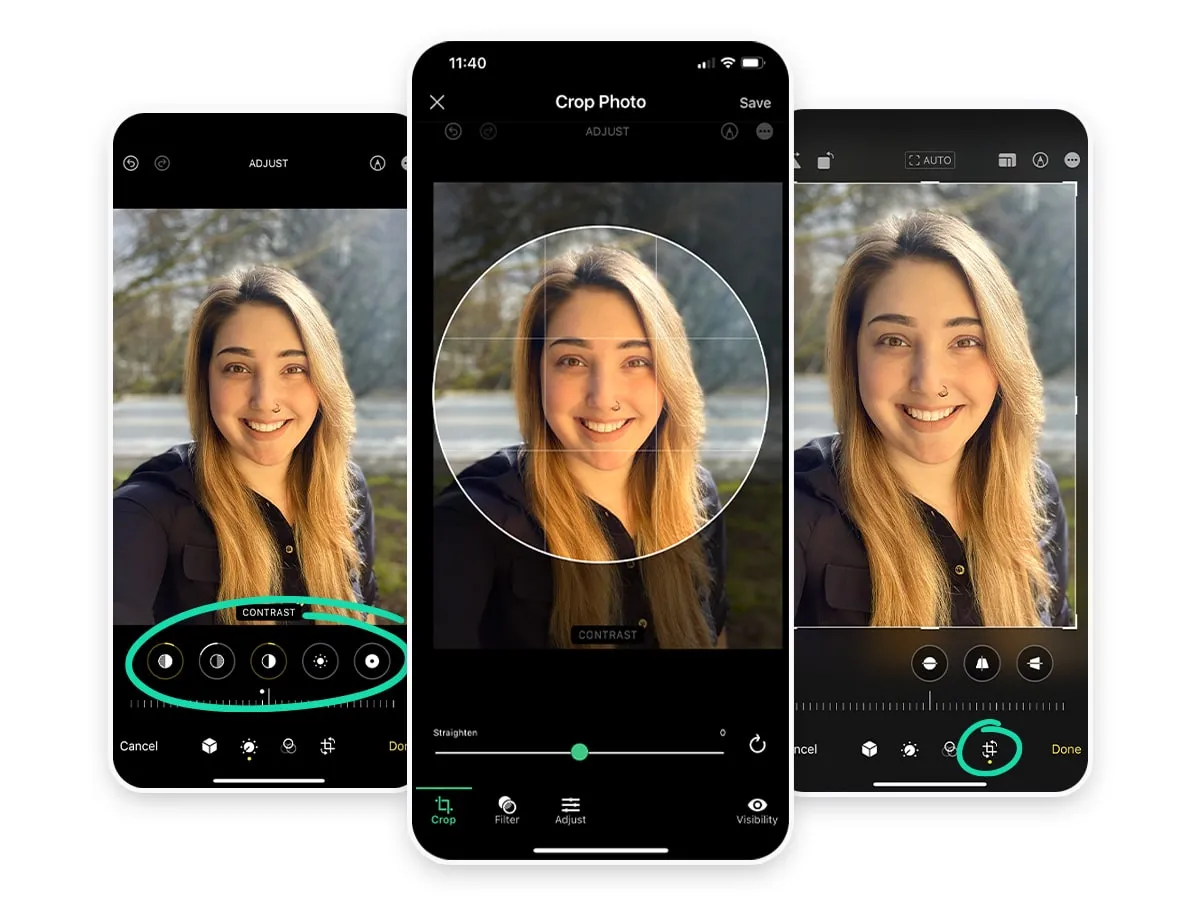
- Edit the photo: Once you have taken the photos, you can use your phone’s editing app within Photos or download an app like VSCO to adjust the exposure, contrast, and color balance to create the perfect headshot.
After capturing your headshot, consider some basic editing to enhance its quality. Adjust brightness and contrast for a clear, vivid image. Crop the photo to focus on your face and upper shoulders. If needed, use photo editing apps to refine the image, but keep alterations minimal to maintain authenticity. For those seeking a professional touch, consider our Virtual Individual Headshots which use the latest AI technology to automatically edit and enhance your headshot. If you’d like more information and headshot tips, read our article about taking a good headshot from home.
Adjusting Phone Settings
To take the best headshot on your iPhone, there are specific settings you can use to improve the photo quality. Here are some settings to consider:
- Use portrait mode: As mentioned earlier, portrait mode can create a shallow depth of field effect, which can help to blur the background and bring the subject into focus. To enable portrait mode, open the Camera app and swipe to the left until you see the "Portrait" option.
- Adjust the exposure: The exposure determines how much light is let into the camera sensor. To adjust the exposure, tap on the subject's face on the iPhone screen, and a yellow box with a sun icon will appear. Swipe up or down to adjust the exposure until you get the right amount of light.
- Turn on the gridlines: Turning on the gridlines can help you to position your subject in the right spot in the photo. To enable gridlines, go to Settings > Camera, and turn on the "Grid" option.
- Use the timer: Using the timer can help to ensure that the camera is stable when taking the photo. To use the timer, open the Camera app, and tap on the timer icon. You can choose between 3 or 10 seconds for the timer.
- Use the front-facing camera: If you're taking a headshot of yourself, use the front-facing camera. To switch to the front-facing camera, tap on the camera icon with two arrows on the top-right corner of the Camera app.
By using these settings, you can improve the overall quality to get the best possible and professional looking headshot.

Apple Watch Tip
If you happen to own an Apple Watch, there’s a way to use it as a remote if you set up your phone on a ledge or tripod. Here's how:
- Make sure your iPhone's camera is open and in the position you want for the photo.
- Open the Camera app on your Apple Watch.
- Your Apple Watch will show a live preview of your iPhone's camera, and you can use it to frame the shot.
- To take the photo, tap the shutter button on your Apple Watch.
- The photo will be taken on your iPhone, and you can then view it on your Apple Watch or your iPhone.
It's important to note that using your Apple Watch to take a photo can be a little challenging since the display is small, and it may take a bit of practice to get the right shot. It's also important to make sure your iPhone is securely positioned to avoid blurry photos.
5 Simple Pose / Posture Rules of Thumb
- Keep your posture upright: Good posture can help to make you look more confident and approachable. Keep your shoulders back and your chin level.
- Relax your face: Try to keep your facial expression relaxed and natural. Avoid making any tense or forced expressions, as these can make the photo look unnatural.
- Look into the camera: Make sure to look directly into the camera lens to create a connection with the viewer. Avoid looking away or down, as this can make the headshot less engaging.
- Experiment with angles: Try different angles to find the one that works best for you. For example, tilting your head slightly can create a more dynamic look.
- Smile naturally: A natural smile can make you look approachable and friendly. Don't force your smile, but try to think of something that makes you genuinely happy.

Editing Your Headshot
When editing a headshot on your iPhone, there are specific edits you can make to enhance the photo and give it a professional look. Here are some edits to consider:
- Crop the photo: If there is extra space around the subject, you can crop the photo to create a tighter composition. Use the crop tool in the Photos app to remove any unnecessary elements in the photo.
- Adjust the exposure: You can use the exposure tool to adjust the brightness and darkness of the photo. Tap the photo in the Photos app, and then tap the Edit button. Swipe up or down on the screen to adjust the exposure until you get the desired effect.
- Adjust the color balance: Use the color balance tool to correct the white balance and color temperature of the photo. This will help to ensure that the skin tone looks natural. Tap the photo in the Photos app, and then tap the Edit button. Tap on the "Color" icon, and adjust the temperature and tint sliders until you get the desired effect.
- Use the Portrait Lighting effects: If you took the photo using portrait mode, you can use the Portrait Lighting effects to add more depth to the photo. Tap the photo in the Photos app, and then tap the Edit button. Tap on the "Portrait" icon, and choose one of the lighting effects, such as Studio Light or Contour Light.
- If any of these sound too complicated, a great place to start is using the “AUTO” adjust setting when editing the photo.

We’ve also put a together a resource that walks you through taking a great headshot using our Individual Headshot platform. If you happen to be using Snapbar Studio to take a headshot, you can follow our step-by-step headshot guide.


-p-500.webp)


.jpeg)


